5/09/2012

SharePoint: Preventing Content Type Changes


There are many good reasons to use Content Types… if you can get people to use them, and then leave them alone.   :-)

When creating a new list item based on a Content Type the user needs to select the Content Type from the New dropdown. Once selected, the Content Type should generally not be changed. Changing it is too easy as the user is offered the choice every time they edit the item.

    image  

Preventing this is pretty easy as all we need to do is hide the first row of the edit form's HTML table. The following JavaScript will do this for us and will work in both SharePoint 2007, SharePoint 2010 and SharePoint Online / Office 365:

<script>
var ttnTables = document.getElementsByTagName("TABLE")
for (var i=0;i<ttnTables.length;i++)
{
  if (ttnTables[i].className=="ms-formtable")
  {
    ttnTables[i].rows[0].style.display="none";
  }
}
</script>


Now the Content Type is hidden on the edit form.

    image

But can the site owner change it?

The only problem with this solution is that it also prevents the site owner from changing the Content Types. We need to only run the above code for non site owners. To do this we will use the SPSecurityTrimmedControl and set the PermissionString to a suitable value, such as ManageWeb.

<!-- default value -->
<script type="text/javascript">
  var canChangeContentType = false;
</script>

<Sharepoint:SPSecurityTrimmedControl runat="server" PermissionsString="ManageWeb">
  <!--text for users who have the ManageWeb permission -->
  <script type="text/javascript">
    canChangeContentType = true;
  </script>
</SharePoint:SPSecurityTrimmedControl>

<script type="text/javascript">
if (canChangeContentType == false)
{
  var ttnTables = document.getElementsByTagName("TABLE")
  for (var i=0;i<ttnTables.length;i++)
  {
    if (ttnTables[i].className=="ms-formtable")
    {
      ttnTables[i].rows[0].style.display="none";
    }
  }
}
</script>
 

There is a workaround!

A user with permissions to create private views can create a DataSheet view with the Content Type column displayed and then edit the Content Type.


Where to add this code

SharePoint 2007

  1. Open SharePoint Designer and open the site with the list that uses Content Types
  2. In the Folder List pane expand Lists and your list
  3. Double-click EditForm.aspx
  4. If the HTML is not displayed, click the Code button at the bottom of the page
  5. Search for "PlaceHolderMain"
  6. Select the entire line, right-click the line and select Find Matching Tag (this should find </asp:Content>)
  7. Add the JavaScript from above just before the </asp:Content> line
  8. Save and test (remember, as a Site Owner you will always be able to see the Content Type)

SharePoint 2010

  1. Open SharePoint Designer and open the site with the list that uses Content Types
  2. In the Navigation Pane click Lists and Libraries
  3. Click the name of the list that uses Content Types
  4. In the Forms area click EditForm.aspx
  5. If the window is split into Design and Code views, click the Split button at the bottom of the window
  6. Click in the area just below the existing web part
    image
  7. You should see something similar to the following in the Code view:
    image
  8. Paste the JavaScript from above between the DIV tags
  9. Save and test (remember, as a Site Owner you will always be able to see the Content Type)


.

5/08/2012

Adding JavaScript and CSS to SharePoint


Many of my Site Owner customization tips require adding CSS and JavaScript to individual pages, the Content Editor Web Part or to the master page. Instead of repeating those steps over and over I'll link to this page in the future. (This is an expansion of an earlier article found here.)

Where to put your JavaScript or CSS

Where to put your JavaScript or CSS

Where you put the JavaScript or CSS largely depends on what it does and if it needs to interact with a single list, a single page or an entire site. Here are some possibilities:

  • Content Editor Web Part - Use a CEWP when you want to add code to a single web page that is also a web part page. (See the Web Part chapter of my book for ways to see if a page is a web part page)
     
    Features:
    • Easy to use (Source Editor in 2007 and HTML editor in 2010)
    • Easy to reuse (Exportable - see the Web Part Must Knows chapter of my book for details)
    • Can be placed directly in the web part page that needs the JavaScript or CSS
    • JavaScript or CSS can also be added by linking to a text file stored in a SharePoint library. This file can have any extension, but using .HTM will let you open the file directly into SharePoint Designer.
  • Directly in a page - Use SharePoint Designer when you want to directly edit a Basic Page, Web Part page or a site page. You can add the JavaScript inside of <SCRIPT> tags, the CSS inside of <STYLE> tags, or link to a file that contains the code. Typically add your code just before the ending content tag for PlaceHolderMain. (</asp:Content>)
  • Master Page - Use SharePoint Designer to add code to a master page when you want to code to be available on every page in a site. You can add the JavaScript inside of <SCRIPT> tags or link to a file that contains the JavaScript. Typically add your CSS just before the </HEAD> section and your JavaScript just before the </BODY> tag.


CSS

CSS is typically added inside of a <STYLE> block. The following will change the title of a 2007 site:

       <!—the following overrides the SharePoint ms-sitietile Core CSS class --> 
       <style type="text/css"> 
           .ms-sitetitle 
           { 
             color:blue; 
             font-size:30pt;
           } 
       </style>


CSS can also be stored in a file in a library and linked:

     <link rel="stylesheet" type="text/css" 
           href="/sites/training/shared documents/mycustom.css" />


JavaScript

JavaScript is typically added inside of a <SCRIPT> block. The following will add a border around the site's icon:

<script type="text/javascript">
var siteImage = document.getElementById('GlobalTitleAreaImage');
if (siteImage != null)
{
  siteImage.style.border = 'dashed';
}
</script>


JavaScript can also be stored in a file in a library and linked:

<script type="text/javascript" language="javascript" 
            src="/sites/training/shared documents/mycustom.js"></script>


The CEWP in SharePoint 2007

The CEWP in SharePoint 2007 is a simple web part that includes four options to add content:

  • a Rich Text Editor with all of the HTML editing options you might expect
  • the Edit HTML Source button (image) inside of the Rich Text Editor toolbar
  • a Source Editor that is very simple text editor, so simple you many want to use another tool to write your code, and then just copy it to the Source Editor
  • a Content Link box to link to an external file containing your code - this file would typically be stored in a library
To add a Content Editor Web Part

1. Display any web part page, click Site Actions, Edit Page then Add a web part:

    image

To edit a Content Editor Web Part

1. Click the web part's edit button then select Modify Shared Web Part, then click the Source Editor button

    image

2. Or, if you have linked to a text file, then just open that text file directly from a library, make your edits and then save. No need to open the CEWP.

Tip: You can open linked code files from within SharePoint Designer by just expanding the library's folder and double-clicking the file. You will then be able to use SharePoint Designer's JavaScript, HTML and CSS editors with their color coding and auto completion features.

Hiding the CEWP title bar

The CEWP will often be used to store code and will not need a title or title bar displayed on the page.

  • In the properties editor, expand Appearance, click the Chrome Type dropdown and select None

image


The CEWP in SharePoint 2010

In 2010 it’s now just called "Content Editor" and is in the Media and Content section of Add a Web Part:

    image

The page with the new web part:

    image

How do you add HTML?

When you add this web part you get a "wiki style" editor for normal rich text editing. When you use the web part's edit dropdown and click Edit Web Part you will find that the Source Editor button is gone! So how do you add your JavaScript and CSS? You could just click the HTML button in the Ribbon (image), but read on for some fun issues with this option…

    image

When you add CSS or JavaScript you may get this nice little message:

    image

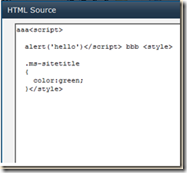
Consider this trivial example:

    image

Each time you go back into the HTML editor and click OK it adds another blank line after the script tag and removes line breaks elsewhere!
    image

It has even sometimes changes the capitalization. In one of my edits it changed color:red to COLOR:red.     Who knows why…


The fix? Just link to your code!

Both 2007 and 2010 offer the option to link from the CEWP to a text file with your content. To avoid the problem with the random edits made by 2010 just upload a text file containing the code to a library. Then in the CEWP just click the Edit Web Part option in the dropdown and add the link to the code file. This has added benefit of using any HTML, CSS and JavaScript editor such as Visual Studio or SharePoint Designer to edit your code.

To edit a Content Editor Web Part

1. If the CEWP includes displayable text, the just click anywhere in the web part to open up the editor ribbon and start typing.

2. If you have linked to a text file, then just open that text file from the library, make your edits and then save. No need to open the CEWP during each edit, just refresh the page to see the changes.

Tip: You can open linked code files from within SharePoint Designer. Click All Files, click the "push pin" to expand the list of files, expand the library, and double-click your file. You will then be able to use SharePoint Designer's JavaScript, HTML and CSS editors with their color coding and auto completion features.


Reusing a Content Editor Web Part Customization

You can easily reuse many CEWP customizations by exporting the web part to a file and then uploading it into another site. As the CEWP is just a container for text (HTML, JavaScript, CSS, etc) it will have few external dependencies and should be reusable in other pages and sites.

A few watch outs:

  • If the CEWP code has an absolute URL to an image, JavaScript file or other resource, then the links will still work, as long as the users of the new site have permissions to the linked files in the original site
  • If the CEWP code has relative URLs, then the new site will need the same files stored in libraries with the same library name and file names AND the same site URL (SharePoint relative URLs are relative to the site collection, not to the subsite)


Direct page edits using SharePoint Designer?

Almost everything you can do with the CEWP can also be done by adding your customizations directly to the page using SharePoint Designer.

Advantages of direct page edits:

  • Edits are completely hidden from site users, especially site members as there are no web parts they can edit or delete
  • Code added directly to a SharePoint 2010 view page will not break crumb trail and view menu features (See "The CEWP in SharePoint 2010" later in this chapter)
  • SharePoint Designer's editors make writing JavaScript, HTML and CSS easier with color coding and auto completion features

Disadvantages:

  • You must use SharePoint Designer - and your company may have a policy against this
  • The page will changed from un-customized (ghosted) to customized (un-ghosted), which has a small impact on performance (See chapter 6 for more details)
  • Customizations are harder to find by the next site owner who inherits your site
  • More steps are needed for each edit

To add code directly to a page:

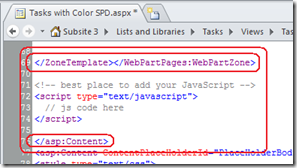
Add your JavaScript code between the end tag for the Web Part Zone and the end tag for the PlaceHolderMain content tag (</asp:Content). (See chapter 6 of my book - "Editing a SharePoint Page")
    image


Editing the Master Page

JavaScript and CSS that impacts every page in the site needs to be added to the master page. CSS will typically be added in the <HEAD> section of the page. Links to JavaScript libraries will also be added to the <HEAD> section. JavaScript blocks will typically be added just before the </BODY> tag at the end of the master page.

For CSS, your custom styles can be added just after these two controls:

    <Sharepoint:CssLink runat="server"/>
    <SharePoint:Theme runat="server"/>


SharePoint 2007 Steps

Steps:

  1. Open your site in SharePoint Designer 2007
  2. Expand the _catalogs folder and expand the masterpage folder
  3. Double click the master page (typically default.master)
  4. If not already selected, click the Code button at the bottom of the window
  5. For CSS and linked files find the </HEAD> tag in the page
    For JavaScript script blocks, find the </BODY> tag in the page
SharePoint 2010 Steps

Steps:

  1. Open your site in SharePoint Designer 2010
  2. In the Navigation - Site Objects pane click Master Pages
  3. Right-click your site's master page (typically v4.master) and select "Edit in Advanced Mode"
  4. If not already selected, click the Code button at the bottom of the window
  5. For CSS and linked files find the </HEAD> tag in the page
    For JavaScript script blocks, find the </BODY> tag in the page


When will my scripts run?

A simple embedded script like the following will run as soon as the browser loads it.

<script type="text/javascript">
  alert('hello world!');
</script>

If the script is in the middle of the page, like it would be when loaded using a Content Editor Web Part, then the script will run before the page has been fully created by the browser. Most JavaScript for SharePoint projects will need to run after the HTML that it's going to interact with has been fully loaded, and quite often, after the entire page as been loaded.

To see how to deal with JavaScript running at the wrong time in SharePoint see Chapter 5's section on "Controlling when JavaScript Runs" in my book.

5/07/2012

SharePoint 2010, the Content Editor Web Part, and Broken Views…


The following is an excerpt from chapter 7 of my book SharePoint 2007 and 2010 Customization for the Site Owner. I keep getting questions on this so I thought I’d post it here. (You should still by the book!)


Adding a Content Editor Web Part to a view page like "Allitems.aspx" is a great way of customizing list and library views in SharePoint 2007. This generally had no negative impact, was easy to do and produced some major improvements with little work.

The Problem in 2010?

SharePoint 2010 treats view pages with added web parts as non-views and removes many view related features. I.e. adding a web part to a view breaks some things…

Here's a typical Task list All Tasks ("Allitems.aspx") view with the view menu clicked:

  image

Note these features:

  • The name of the view is displayed: Subsite 3 > Tasks > All Tasks
  • There are ribbon tabs for Browse, Items and List (or for a library, Documents and Library)
  • There is a dropdown arrow after "All Tasks" in the crumb trail

Here is the same view after the addition of a Content Editor Web Part (and the JavaScript to color code the task list):

  image

Note what's missing:

  • The name of the view in the crumb trail is missing
  • The ribbon tabs for Items and List are missing
  • The dropdown arrow after "All Tasks" in the crumb trail is missing
  • You can still get to the ribbon tabs, but you have to first click a row in the list:

        image


The Fix?

Don't add web parts to a 2010 view! (Duh) Instead, edit the page using SharePoint Designer 2010 and add your JavaScript code between the end tag for the Web Part Zone and the end tag for the PlaceHolderMain content tag.

    image

You can either embed the JavaScript:

    <script type="text/javascript">
        // js code here
    </script>

Or you can link to a text file with the JavaScript that you've uploaded to a library:

    <script src="../../SitePages/ColorCodedTaskList.txt" type="text/javascript"></script>


.

5/04/2012

SharePoint Governance Training


Creating a SharePoint governance plan, correctly, can be a real challenge as SharePoint governance is only partially about SharePoint. Because SharePoint is (too) easy to use it attracts content, user, compliance and best practices problems. Without a plan… well you know what you’ve got.

There are several approaches to creating your governance plan. One is to download one of the sample plans and do a little quick editing, and call it done! The second is to pay a consultant to write one for you, copied from their generic templates, which you can then file away and call it done. The third is to attend training to learn how you can create a proper plan unique to your company. The training I offer through MAX Technical Training is available in two formats, private training for your team, and public training. Which is best? I would recommend both. Ideally your future governance team leader(s) would first attend a public class. There they would discover the full scope of governance and learn about the issues and concerns from the other attendees, things that they had never considered . After the public training they would know enough about governance to assemble a proper governance team and schedule a private training / consulting session to start writing a proper governance plan.

The next public class is next week and there are still openings available. This is your opportunity to both discover the full scope of SharePoint content and user governance, and to learn from the experiences of other governance teams.

The next class is Thursday, May 10th, 2012 at MAX Technical Training.

MA-1040 - SharePoint Governance 2007 and 2010
http://www.maxtrain.com/Classes/ClassInfo.aspx?Id=741

For information about private governance team training contact MAX at 1-513-322-8888.


.

4/30/2012

Cincinnati and Dayton SharePoint User Group May Meetings


Cincinnati SharePoint User Group

http://www.CincinnatiSPUG.org

Thursday, May 3rd, 2012, 6:30 PM (Pizza and networking at 6:00)

This month's presentation:

How many web applications do I need? Why?
Speaker: Shane Young, SharePoint Server MVP

In this session we will talk about web applications and how with proper planning they make life easier for your users, not harder as often assumed. From web applications we will also drill into site collections and why they should be the center of your universe. Quotas? Yeah! We need talk about them. Another key element will be branding. And finally we will sprinkle in some ideas how all of this will make having a governance plan easier. So come to this session and bring your questions. I like questions!   :-)


Dayton SharePoint User Group

http://www.dayspug.org

Tuesday, April 10, 2012

This month's presentation:

SharePoint Diagnostics

Riverbed will discuss how to solve the latency issues/bandwidth constraints associated with accessing SharePoint files or portals over the WAN, or even the individual remote user who needs to access large files quickly.

Social Event and Food:  6:00 p.m. until 6:30 p.m.

Announcements/Sponsors:  6:30 p.m. until 6:45 p.m.

Main Presentation:  6:45 p.m. until 8:00 p.m.

4/20/2012

SharePoint Saturdays in Dayton and Cincinnati


SharePoint Saturday Dayton


June 30th, 2012

  • Call for sponsors! (almost over!)
  • Call for speakers! (until May 4th)
  • Registration is now open!

http://www.sharepointsaturday.org/dayton

Follow on Twitter: @SPSDayton


SharePoint Saturday Cincinnati


October 27th, 2012

Follow on Twitter:  #SPSCincinnati

http://www.sharepointsaturday.org/cincinnati


.

4/04/2012

Cincinnati SharePoint User Group Meeting 4/5/2012!


Update… 4/5, not 4/4!!!


This month we will have two presentations:

  • Clint Richardson will be giving a presentation on SharePoint Security
     
  • Bill Crider will be giving a presentation on customizing My Sites


And… I have a couple of new books to add to the door prizes.


http://www.CincinnatiSPUG.org

Twitter: @cincyspug


Logo created by Michael Hiles


.

SharePoint Saturday Call for Speakers and Sponsors is Open!


Our very first SharePoint Saturday Dayton is in the works! 

Join SharePoint architects, developers, and other professionals that work with Microsoft SharePoint for the very first "SharePoint Saturday Dayton" event on June 30th.  SharePoint Saturday is an educational, informative & lively day filled with sessions from respected SharePoint professionals & MVPs, covering a wide variety of SharePoint-orientated topics. 

SharePoint Saturday is FREE, open to the public and is your local chance to immerse yourself in SharePoint!

Follow the event on twitter @spsdayton.

Save the date! June 30th, 2012

Sponsors

Looking to support the Dayton area SharePoint community and reach out to SharePoint architects, developers, and other professionals that work with Microsoft SharePoint? A SharePoint Saturday is one of the most effective way of reaching local SharePoint community!

Click here for sponsor information: http://www.sharepointsaturday.org/dayton/Pages/sponsors.aspx


Speakers

SPS Dayton is an opportunity to share your knowledge and experiences with the SharePoint community. We are seeking sessions that are educational, informative, and practical in nature. Abstracts that are submitted should fall into one of four general categories.

  • Development. Sessions that address the SharePoint object model, custom code, interactions with SharePoint via its services, etc.
  • IT Pro. Sessions that cover SharePoint administration, configuration, scalability, infrastructure implementation, and related topics
  • Information Worker. Sessions that pertain to end-user SharePoint concerns such as site design, information organization, SharePoint Designer topics, user adoption, etc.
  • Special Topic. Sessions such as case-studies, cross-disciplinary subjects, and any session that doesn’t fit well in one of the other three categories.

Go here to submit your proposals: http://www.sharepointsaturday.org/dayton/Pages/speakers.aspx


.

3/25/2012

Names you can’t use for a SharePoint subsite!


Try to create a subsite in a publishing site named "Workflowtasks"

Error

The Web site address "/workflowtasks" is already in use.

image


I checked and View All Site Content does not list this subsite. But... it does list a
list named "Workflow Tasks". That should not be a problem as the URL for
lists always include "/Lists/".

http://intranet.contoso.com/Lists/Workflowtasks

So why can’t I create a subsite named “workflowtasks”? When the publishing feature is enabled it creates a special list in the root of the site (i.e. no "/Lists/") named "workflowtasks".

(Why would you ever create a subsite named “Workflowlists”?  Because in one of my SharePoint workflow classes step one of the lab said “create a subsite named “Workflowlists”!)


Other root level list names that cannot be used for subsites

The following is a list of a few of the names that cannot be used as subsites of a Publishing template based site:

  • Long Running Operation Status
  • Notification Pages
  • PublishedLinks
  • Quick Deploy Items
  • Relationships List
  • Reports Lists
  • ReusableContent
  • Variation Labels 


Other root level folder names that cannot be used for subsites

The following are names used in almost every SharePoint site for folders. Some are found in every subsite while a few are only found in top level sites.

  • _catalogs  ("Error: Site names cannot contain certain reserved words and
    cannot begin with an underscore.")
  • _cts
  • _private
  • images
  • Lists
  • m

image   image


Library names that exist in a site cannot be used as a subsite name


Error

The Web site address "/Shared Documents" is already in use"

  • Shared Documents
  • SitePages
  • etc...

Try to create a subsite named "Lists"...

Error

Cannot create a Web at "/lists" because a folder already exists at this
location.


To find names that are not valid as subsite names

Open your site in SharePoint Designer. In 2007 all of the folder and root level list and library names are displayed in the left panel. In 2010 click on “All Files”. (If you don’t see “All Files” then your Site Collection Administrator or you server administrator may have removed your “Allow Site Owners and Designers to See the Hidden URL structure of their Web Site” permission.)


A sample All Files in SharePoint Designer 2010:

image


.

3/15/2012

Last Chance to Sign Up for SharePoint Cincy 2012!


SharePoint Cincy – March 16th, 2012

Northern Kentucky University’s Center for Applied Informatics and MAX Technical Training are bringing a major SharePoint event to the Cincinnati area! SharePoint Cincy will be held at the METS Center located in Erlanger, KY. The METS center is near the Cincinnati airport (CVG) and has lots of free parking.

You’ve got to be registered to attend and it’s filling up fast. Last year was a sell out and this year is a bigger and better event!

See the site for the agenda, speakers and registration: http://www.sharepointcincy.com


SharePoint_Cincy_2012_blog_graphic3[3]

Note to spammers!

Spammers, don't waste your time... all posts are moderated. If your comment includes unrelated links, is advertising, or just pure spam, it will never be seen.