Showing posts with label SharePoint Site Owner. Show all posts

2/21/2016

Hide the Attachments Link in a SharePoint Form


The problem… While we do want site visitors to see the list items, we don’t want them to see or click the list’s attachments.

More SharePoint Customization tricks!
More Site Owner articles.
More articles about the SPSecurityTrimmedControl
image

One approach is to use CSS and a handy SharePoint control. You could also write a JavaScript solution. Here we will look at the CSS option.

Note: This is not security! This is hiding some HTML using CSS. Users can right-click and select View Source to discover the text hidden by the CSS.


General pattern:

  1. View the DispForm.aspx page (the view properties popup in SP 2010) for an item in the list.
  2. Press F12 to open the IE Developer Tools.
  3. Use the Internet Explorer F12 panel’s Select Element button to discover an appropriate tag and ID that could changed by CSS to show/hide the content.  (For this example it happens to be “idAttachmentsRow”.)
    image
  4. Edit the DispForm.aspx page using SharePoint Designer.
  5. Add CSS to hide the tag from everyone.
  6. Add a SharePoint control with additional CSS to unhide the content for users with at least the Edit permission. Set the SharePoint control to only display its content for people who can edit list items.

The SPSecurityTrimmedControl

The magic here is that the SPSecurityTrimmedControl can selectively display content based on a user’s assigned permission. As an example, users with the Read permission level do not have the EditListItems permission while members and owners do. Note that the control can only be set to a single permission, not a Permission Level or group.

More detailed steps:

  1. Open SharePoint Designer and your site.
  2. Click Lists and Libraries and your list.
  3. Click the DispForm.aspx file.
  4. In the ribbon click Advanced Mode.
  5. Find the PlaceholderMain Content tag (<asp:Content ContentPlaceHolderId="PlaceHolderMain" runat="server">)
  6. Add the following block of HTML just after that tag.
  7. Save your changes and test.


SharePoint 2010 (and probably 2007) version:

<style type="text/css">
  #idAttachmentsRow { display:none }
</style>
<Sharepoint:SPSecurityTrimmedControl runat="server" PermissionsString="EditListItems">
  <style type="text/css">
    #idAttachmentsRow { display:inline }
  </style>
</Sharepoint:SPSecurityTrimmedControl>

SharePoint 2013 and SharePoint Online / O365 (and probably 2016) version:

<style type="text/css">
  #idAttachmentsRow { display:none !important }
</style>
<Sharepoint:SPSecurityTrimmedControl runat="server" PermissionsString="EditListItems">
  <style type="text/css">
    #idAttachmentsRow { display:table-row !important}
  </style>
</Sharepoint:SPSecurityTrimmedControl>

A list of the PermissionsStrings can be found here: https://msdn.microsoft.com/en-us/library/microsoft.sharepoint.spbasepermissions.aspx

More about using SPSecurityTrimmedControl can be found here: http://techtrainingnotes.blogspot.com/2009/07/sharepoint-run-javascript-based-on-user.html


.

12/30/2015

SharePoint – Adding Dropdown Menus without the Publishing Feature


The following works in SharePoint 2013, 2016 (beta 2) and SharePoint Online.


One of the common reasons to enable the Publishing Feature was to get the Navigation page so you could have dropdowns in the Top Link bar. Turns out that in 2013 and later you can do this without the Publishing Feature.

The Trick!

The trick is drag and drop. Starting with SharePoint 2013 you have an “EDIT LINKS” button on the page. (No Top Link Bar or Navigation page needed!)

image

When you click EDIT LINKS you can add a new item to the menu by clicking the (+) button.

image

Then there’s the trick! Drag the new link just under the parent link. (I’ll drag this one under the “Subsite1” link.)

image

image

Click Save and now you have dropdowns!

image


What you don’t get…

The Publishing feature Navigation page lets you select options like Open in New Window and Audience selection.

But if all you need are some dropdowns…


.

11/16/2015

Add a Crumb Trail to SharePoint 2013


Solution #1: Restore the SharePoint 2010 Navigate Up button

See here: http://techtrainingnotes.blogspot.com/2014/06/sharepoint-2013-restoring-2010-navigate.html

[image%255B21%255D.png]


Solution 2: Add an always displayed site crumb trail

If you only need a crumb trail to be able to navigate back up to a parent site then we can add a site map control to the master page like this:

<span style="font-size:8pt;">
  <asp:SiteMapPath id="ContentMap2" 
       SkipLinkText="" NodeStyle-CssClass="ms-sitemapdirectional" 
       runat="server"/> 
</span>

Edit your master page, search for "</h1>" and add the HTML above just below the "</h1>".

The result will look like this:

image


Solution 3: Add an always displayed site and folder crumb trail

See the link below for a nice solution that reuses the SharePoint:ListSiteMapPath control from the SharePoint 2010 Navigate Up control and reformats it into a single line.

http://www.broculos.net/2013/12/sharepoint-2013-branding-show-folder.html

The result looks like this:

image

Notes:

  • The author of that article was working with a Publishing feature Design Manager master page and wrapped the control inside of an HTML comment block. (<!--   -->) You will not need this for a non-publishing site master paged edited in SharePoint Designer.
  • The article's sample CSS code needs to be placed inside of a linked CSS file or inside of style tags. <style type="text/css">  ,,,  </style>
  • To get the crumb trail display exactly where I wanted it I added it just after the "</h1>" tag in the master page and added this to the article's CSS:
      .my-breadcrumb {
         margin-top:0px;
         margin-left:3px;
         font-size:8pt;
      }


Other options

Here's a project that adds a folder crumb trail to library web parts using JS Link: SharePoint 2013: Folder Navigation/Breadcrumb
http://social.technet.microsoft.com/wiki/contents/articles/19713.sharepoint-2013-folder-navigationbreadcrumb.aspx and here: http://ranaictiu-technicalblog.blogspot.com/2013/07/sharepoint-2013-folder-navigation-for.html

The only disadvantage to this solution is that you need to make a change to every list/library/view web part.


.

11/14/2015

Weird SharePoint Icons = Timeout!


Have you ever had a SharePoint page "explode"? Odds are something from the server timed out. In the example below the CSS files never got loaded. The links timed out. A simple refresh should fix it. If it does, let your server admins know about the issue.

BTW, those weird looking icon collections are call image sprites.

image


If the refresh does not fix the problem, you may have a broken master page. (Have you been playing around with SharePoint Designer?) You can either use SharePoint Designer to select a working master page or edit your site's URL to take you to the Site Settings page and select one there..
Change:
  http://yourServer/sites/yourSite/Pages/Default.aspx  (or whatever your URL looks like)
to something like:
  http://yourServer/sites/yourSite/_layouts/settings.aspx  (2013 will redirect and add a "15" to the URL.)

From that page you can select another master page or make other changes to fix the issue. In some cases you even need to open SharePoint Designer to undo the change you made or to select another master page. For a publishing site click Master Pages in the Look and Feel section of the Site Settings page. If you see the following message then you do have a master page problem.

image

In some cases, just clicking OK and selecting the same master page will fix the problem. Otherwise, select Seattle or Oslo and see if that gets your site working again.

11/08/2015

Fifty+ SharePoint 2013 Sample Background Images

The following applies to SharePoint 2013 and SharePoint Online / Office 365.

Theme Background Images

When designing a theme for your site you can use a background image for the page. Did you know that SharePoint 2013 includes more than fifty 1024 x 768 sample images? Ten of the sample themes use the first ten of these images. These ten images and forty more can be found at the following URLs:

https://yourServerDomain/_layouts/15/images/image_bg002.jpg
or
https://yourServerDomain/sites/yourSite/_layouts/15/images/image_bg002.jpg

Replace the “image_bg002.jpg” with the names from the samples below.


Background images used with the sample themes:

image


Additional Background Images Available:

image
image

image

image

image


And a few more interesting images from that folder:

image

.

10/30/2015

Trick or Treat? A Day in the Life of the SharePoint Share Button…


Every once and a while I work a little on my next book, SharePoint 2103 Security. At the pace I'm going it may never get done. As I'm always a bit surprised at the response and disbelief I get when I tell people about the Share button, I added a chapter to the book about the Share buttons, what they do and what you can do about them. As the book may never get done… I'll click a "share" button and share part of it with you. 


Is the Share Button Evil? 

So how about a little demo. One of my users, Sam, thinks Susan would be interested in one of our purchase orders. Here’s a walkthrough of what Sam, Susan, a few other strangers, and the Site Owner might see.


Mike adds a team member to the new site

Mike, the Site Owner of a new site, adds Sam to the members group.

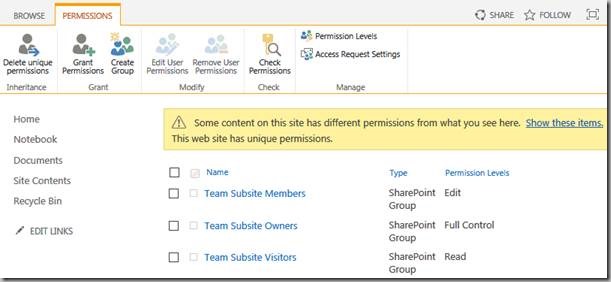
  1. Mike goes to Settings (gear), Site Settings, Site Permissions.
    clip_image002
  2. There he notes that this site has unique permissions, i.e., does not inherit permissions from the parent site, and that users currently only have access to the site through group membership. He also notes the “different permissions” message and checks it to see that it only applies to the MicroFeed.
     
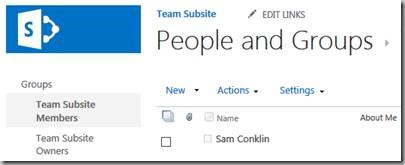
  3. Mike adds Sam to the Team Subsite Members group. Note that the group has the default “Edit” permission level. (Sam can add, edit and delete documents, and customize and delete the entire library!)
    clip_image004


Along comes Sam…

Sam is browsing the Purchase Orders library and thinks Susan would be interested in one of the Purchase Orders.

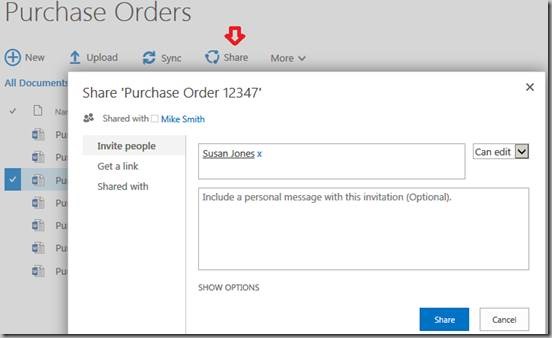
  1. Sam checkmarks one of the purchase orders and clicks one of the Share buttons. (Share buttons are above the library, in the ribbon and in the “…” menus.)
    clip_image006 
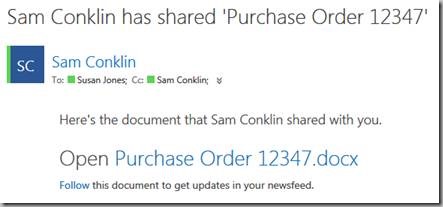
  2. Susan receives an email with a link to the document. Sam got copied on the email, but the Site Owner did not.
    clip_image008


Susan gets an email…

Susan receives the email and out of curiosity…

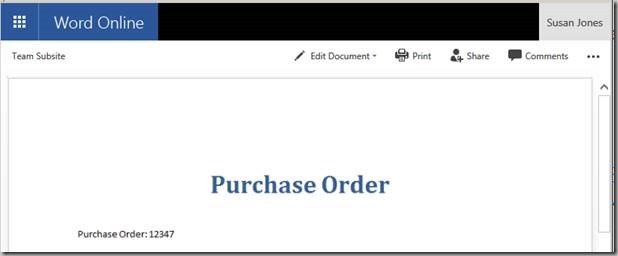
  1. Susan clicks the link in the email… the document opens in Office Word Apps (now called Office Online). If the document is not supported by Office Web Apps or the browser then Susan will get a blank page with a download prompt.
    clip_image010 
  2. Susan sees the “Share” button! She clicks it and shares the file with a coworker!
    clip_image012


And then there's Stella…

  1. Stella clicks the link, and not knowing about the auto-save features of Office Web Apps, makes a fun edit.
    clip_image014 
  2. Not knowing about the “comments thing” she adds a couple little test comments.
    image
     
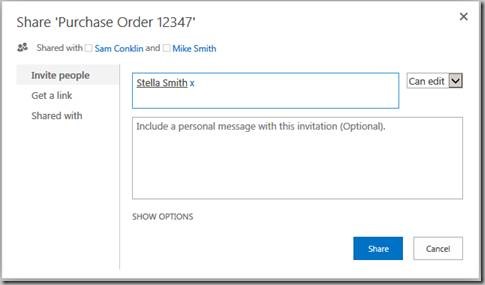
  3. Stella thinks this is kind of fun and clicks the Share button…………
     
  4. Later she sees the site name (“Team Subsite” in this demo) and clicks the link.
    clip_image018 
    As she has "Limited Access" to the site she can see the library page, and there only the document that was shared with her. While she cannot see Quick Launch or the Top Link bar, she can see other custom text and links that you may have added to the site's master page. She may also see that you have changed your site logo to a picture of your new top secret product.


Bad day for Mike!

  1. The next day Mike gets a phone call from the team member who created the purchase order asking “Who is Stella” and why is she making changes to my purchase orders? I thought you only granted access to this site to our team? Oh, and I’m going to talk to HR about some of the comments she added!”
        image 
  2. Mike starts doing detective work…
    1. The file has been modified. (“Gee I wish I had turned on versioning!” he says.)
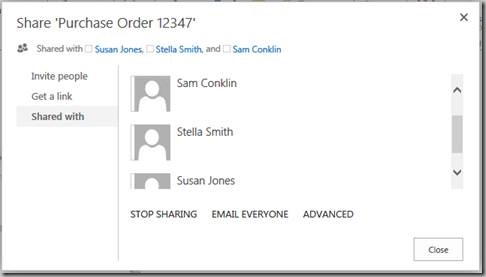
    2. He checkmarks the purchase order, clicks the Share button (one of several ways to do this) and clicks Shared With, and sees “there’s a lot of sharing going on!”
         clip_image020 
    3. He notes that Sam is on the team, but has no idea who Stella or Susan are. Hoping to find who shared this file with these people, he clicks ADVANCED.
          clip_image022 
    4. But, there’s nothing there that he hadn’t already seen.
       
    5. He clicks Check Permissions, enters Stella's name and only learns that she has Limited Access. This only lets him know that she has special permissions set on some object in the site… could be one item or hundreds… and there's nothing out of the box that will list them all in one step.
          image 
    6. Sam goes to Settings, Site Settings, Site Permissions to see if there anything to be learned there.
         clip_image024 
    7. Clicking Show users he again finds that Stella and Susan have Limited Access permissions to the site.
          clip_image026 
    8. Clicking Show these items he finds he has a dozen libraries with hundreds of “shared” files, all with broken inheritance.
       
    9. Mike thinks about finding another job…
       
  3. A few days later Mike creates a new group called Managers and adds three people to the group. Later one of those people call Mike about a missing purchase order. “Hey Mike, I can see PO’s 12345, 12346, 12348, 12349, but not 12347. Did we skip a number?”
    1. With broken inheritance Mike has to remember to grant access to all broken inheritance files whenever adding new groups.
       
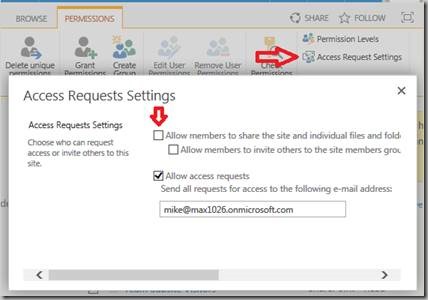
  4. Mike gives up, resets all of the broken inheritance (hours of work) and turns off the ability for team members to share:
        clip_image028
    He did leave “Allow access requests” for those special situations.
     
  5. If he unchecks all of the Access Request options then the Share buttons are still displayed to tempt the users, but when they click the buttons they will get this popup:
        image

    You may just want to hide those Share buttons! Take a look at this article: http://techtrainingnotes.blogspot.com/2015/08/hiding-evil-sharepoint-2013-share.html


And did you know…

Visitors can share! But at least it’s not automatic. When they click Share and complete the form a Sharing Request is sent to the site owner (actually the name listed in the Access Request Settings dialog box). And there’s a surprise… the new user by default gets Edit Permission Level access to the document!

The flow:

  1. Visitor user checkmarks a file, clicks Share and share the file.
  2. A popup is displayed:
        clip_image030 
  3. The site owner gets an email,
    clip_image032
    and if they go to Settings, Site Settings, Site Permissions they will see:
        clip_image034 
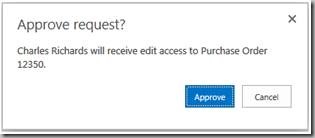
  4. If the site owner clicks the link in the email and approves, the user gets the Edit Permission level. If the site owner goes to Site Permissions and click the link there, they can click “…” and pick a permission.
    clip_image036


Takeaways…

  1. Sharing a file is easy!
     
  2. By default, team members can share any file.
     
  3. Visitors can even generate Share Requests that could result in someone else getting “Edit” permissions on the document.
     
  4. Sharing breaks inheritance and complicates future site maintenance.
     
  5. There is no audit trail. No “who done it” report.
     
  6. There are no built-in tools or reports to list everything a user has access to. (Third party tools and/or PowerShell to the rescue!)
     
  7. It can be turned off. The buttons can even be hidden with a customization.
     
  8. Having items with broken inheritance will create a lot of additional work for site owners and auditors.


.

Oh, and if you can't wait for the book…

Buy the 2010 book. A good 98% of it still applies to 2013. The only big things missing are the Edit Permission Level, the Share buttons and App permissions.

SharePoint 2010 Security for the Site Owner: and for Administrators and Developers!


.

10/27/2015

SharePoint: Sort and Filter on One Column While Displaying Another

This article includes both 2010 and 2013 examples.

Let's say you wanted to display a Date/Time down to the minute or second, but you wanted the column heading to filter by days or months. By default the column filter dropdown displays one each of what ever it finds in the column, or in the case of dates, the nearest day.

image

But if you want just the months or years in the dropdown, then maybe something like this:

image        image


It's not to hard to do in SharePoint 2010, and fairly easy in SharePoint 2013

In SharePoint 2010 we still have a fully working SharePoint Designer that can easily edit web parts. In SharePoint 2013, Designer is pretty much broken for web part work, which is just as well as we should be looking at the newest tools in 2013 for our customizations. In this example we will be using JS Link for 2013.


Steps for SharePoint 2010

The basic steps:

  • Create a new list named "Event Announcements".
  • Add a Date and Time column named "EventDate".
  • Add a Calculated column named "Event Date" to display a YYYY-MM version of the date that can be used to filter by month.
  • Use SharePoint Designer to display the full date in the calculated column by hand customizing the XSLT.

Note: Although the names of my columns differ only by a space, you can use any column names you like. I will use EventDate for data entry and Event Date for display.

Steps:

  1. Go to your site and create a test list. For this example an Announcements list would be a good choice.
  2. Create a new column named "EventDate". (You will enter your date data here.) 
    1. In the List ribbon click Create Column.
    2. Enter "EventDate" as the name.
    3. Set the type to Date and Time.
    4. Set Date and Time Format to Date & Time.
    5. Click OK.
  3. Create a new column named "Event Date". (This column will control the filter grouping.)
    1. In the List ribbon click Create Column.
    2. Enter "Event Date" as the name.
    3. Set the type to Calculated.
    4. Enter this formula:
         =TEXT([EventDate],"yyyy-mm")
      or for years instead of months:
         =TEXT([EventDate],"yyyy")
    5. Set The data type returned from this formula to Single line of text.
    6. Click OK.
  4. Add some sample data with dates spread across two or three different months.
     
  5. Open SharePoint Designer 2010 and open your site.
  6. Click Lists and Libraries and click your list.
  7. Find and click your view (I used All Items).
  8. If the screen is not in Split view click Split at the bottom of the screen.
  9. In the Code view pane click in the web part code. (The code without the yellow background.)
  10. In the List View Tools / Design ribbon click Customize XSLT and Customize Entire View.
    image
  11. In the design view click on any one of the dates in the EventDate column.
       image
  12. Verify the field name by looking up a few lines for FieldRef_ValueOf. My field is EventDate.
       image
  13. In the design view click on any one of the dates in the Event Date column. (the calculated column)  This will highlight a line in the Code view.
  14. Edit the "value-of" element to change from this:
      <xsl:value-of select="$thisNode/@*[name()=current()/@Name]"/>
    to this:
      <xsl:value-of select="$thisNode/@*[name()='EventDate']"/>
    Note that you are replacing the expression "current()/@Name" to the name of the field wrapped in single quotes. I.e. 'EventDate'. EventDate is column from which you want to copy the data.
  15. Save the file.
  16. Return to the browser and test the view. You can edit the view and remove the EventDate column as we only need the Event Date column.
       image


Steps for SharePoint 2013

The basic steps:

  • Create the test list and columns. (Same steps as for 2010)
  • Create the JS Link JavaScript file.
  • Upload or save the file to a SharePoint library.
  • Edit the view's web part and link to the JS File.

Steps:

  1. Go to your site and create a test list. For this example an Announcements list would be a good choice.
  2. Create a new column named "EventDate". (You will enter your date data here.) 
    1. In the List ribbon click Create Column.
    2. Enter "EventDate" as the name.
    3. Set the type to Date and Time.
    4. Set Date and Time Format to Date & Time.
    5. Click OK.
  3. Create a new column named "Event Date". (This column will control the filter grouping.)
    1. In the List ribbon click Create Column.
    2. Enter "Event Date" as the name.
    3. Set the type to Calculated.
    4. Enter this formula:
         =TEXT([EventDate],"yyyy-mm")
      or for years instead of months:
         =TEXT([EventDate],"yyyy")
    5. Set The data type returned from this formula to Single line of text.
    6. Click OK.
  4. Add some sample data with dates spread across two or three different months.
     
  5. Open SharePoint Designer 2013 and your site.
  6. In the Navigation area click Site Assets. (or any other library)
  7. Right-click in any empty space in the file area and select New and HTML.
  8. Right-click the new file and rename it to GroupByMonthJSLink.js (any name will do)
  9. Click the new file and then click Edit File.
  10. Select all of the HTML and delete it.
  11. Enter the JavaScript listed below.
  12. Save the file.
  13. Go to the new list.
  14. Click Settings (gear) and Edit Page.
  15. In the list’s web part click the dropdown and click Edit Web Part.
  16. In the web part properties panel expand Miscellaneous.
  17. Enter the following path into the JS Link box:
    ~site/SiteAssets/GroupByMonthJSLink.js
    Note: "~site" points to current site/subsites URL while "~sitecollection" points to the top level site's URL.
  18. Click Apply. (You should see the change to the Event Date column.)
  19. Click OK
  20. In the Page ribbon click Stop Editing.
  21. Test! You can edit the view and remove the EventDate column as we only need the Event Date column.
       image


The JavaScript File

(function () { 

  // do all of the setup work...
  var TTNctx = {};
  TTNctx.Templates = {}; 

  // configure the Event_x0020_Date field to copy the EventDate values 
  // into the Event_x0020_Date column
  TTNctx.Templates.Fields = { 
    "Event_x0020_Date": 
{ "View": function (ctx) {return ctx.CurrentItem.EventDate} } }; // register the override SPClientTemplates.TemplateManager.RegisterTemplateOverrides(TTNctx); })(); // end of function


.

10/25/2015

SharePoint: Launch a Site Workflow from a Link or Button

The following has been tested with SharePoint 2010 and 2013…

There are a lot of questions in the various forums on how to start a Site Workflow, mostly because it is a bit hard to find in SharePoint. For those looking for only that, here's the basic steps:

Start a Site Workflow

  1. Click Site Actions (2010) or Settings (gear) (2013).
  2. Click View All Site Content (2010) or Site Contents (2013).
  3. Click Site Workflows.
  4. Click the workflow!
  5. If displayed, complete the workflow initiation form. (2010 workflows always display an Initiation Form, even if has only OK and Cancel buttons.)


Launching a workflow from a link, button or Quick Launch

Instead of telling your users to go find the Site Workflows page it might be better just to give them a link or button to click. All we need is to know how (and where) to copy and paste the URL or JavaScript and then how to use that to create the link.

image

In SharePoint 2010 there are only two ways to launch a Site Workflow from a link, while in SharePoint 2013 there are four!

For 2010:

SharePoint 2010 Site Workflows have two possible URLs to launch workflows, one for workflows with InfoPath forms and one for workflows with ASPX forms. The kind of form you get depends on your edition of SharePoint. For Foundation, SharePoint Designer creates ASPX forms, while for Standard and Enterprise SharePoint Designer creates InfoPath (.XSN) forms. You can force ASPX forms by disabling the hidden "OffWFCommon" feature. (See note at the end of this article.) 

For Foundation: (ASPX forms)

http://yourServer/sites/yourSite/Workflows/yourWorkflowName/yourWorkflowname.aspx?TemplateID={030c0f5b-f4be-4c32-9fe6-d1fbf18080e1}&Source=http%3A%2F%2FyourServer%2Fsites%2FyourSite%2F%5Flayouts%2Fworkflow%2Easpx

For Standard and Enterprise: (InfoPath forms)

http://yourServer/sites/yourSite/_layouts/IniWrkflIP.aspx?TemplateID={6bc58ac2-b39c-4e35-a644-43335e966291}&Source=http%3A%2F%2FyourServer%2Fsites%2FI%2F%5Flayouts%2Fworkflow%2Easpx

The GUID in the URL is the unique ID for your workflow.


For 2013:

SharePoint 2013 supports two kinds of workflows, 2010 and 2013. As a result we end up with three ways to launch a workflow. The first two are similar to the 2010 URLs listed above. Only SharePoint 2010 style workflows are available in Foundation. 2013 style workflows are only available in Standard and Enterprise if your server administrators have installed support for them.

For Foundation 2013 and SP 2010 style workflows: (ASPX forms)

I'm assuming (a dangerous thing to do!) that the URL is similar to 2010's. In any case we will just be copying the URL.

For Standard and Enterprise 2013 and SP 2010 style workflows: (InfoPath forms) 

https://yourServer/sites/yourSite/_layouts/15/IniWrkflIP.aspx?TemplateID={b5760949-b13a-4348-a309-65a01f8fbde7}&Source=https%3A%2F%2FyourServer%2Fsites%2FyourSite%2F%5Flayouts%2F15%2Fworkflow%2Easpx

For SharePoint 2013 workflows without initiation forms started from a JavaScript function call:

javascript:StartWorkflow4('7032d6a6-66e0-4c22-9483-2971b90b0e64', '', '')

For SharePoint 2013 workflows with or without initiation forms started from a URL:

https://yourServer/sites/yourSite/wfsvc/20a711570d0549ff83adafde04bce160/WFInitForm.aspx?TemplateID={7032d6a6-66e0-4c22-9483-2971b90b0e64}&WF4=1&Source=https%3A%2F%2FyourServer%2Fsites%2FyourSite


Steps to Create Links for Workflows in General

No matter with version or edition, if you are working with hyperlinks to start workflows your links will be created by copying the URL to the workflow and using it to launch the workflow from Quick Launch, an anchor tag (<A>), an INPUT tag or a BUTTON tag.

Copying the URL or JavaScript:

  1. For SharePoint 2010: Click Site Actions, View All Site Content. (or click All Site Content in the Quick Launch area)
    For SharePoint 2013: Click Settings (gear) and Site Contents. (or click Site Contents in the Quick Launch area)
  2. Click Site Workflows. (top right corner of page)
  3. Right-click the workflow and click Copy Shortcut. (or right-click the workflow, click Properties and copy the URL from there.
  4. If the copied link is a URL and not JavaScript:  (JavaScript will only be found for SharePoint 2013 style workflows that do not have an Initiation Form.)
    1. Paste the URL in to Notepad or other text editor.
    2. Remove the absolute part of the path (the http://servername). This is not required, but is a best practice.
      https://yourServerName/sites/yourSite/_layouts/15/IniWrkflIP.aspx?TemplateID={b5760949-b13a-4348-a309-65a01f8fbde7}&Source=https%3A%2F%2FyourServerName%2Fsites%2Ftraining%2F%5Flayouts%2F15%2Fworkflow%2Easpx
    3. Edit the URL after &Source to the URL where you want the user to land after starting the workflow. (Usually the same page they started from, but could be an "after the workflow instructions" page.)
      /sites/yourSite/_layouts/15/IniWrkflIP.aspx?TemplateID={b5760949-b13a-4348-a309-65a01f8fbde7}&Source=%2Fsites%2Ftraining%2FSitePages%2FFurthreInstructions%2Easpx
      Notes: %2F  = "/" and %2E = "."
    4. Copy the edited URL.


Adding a link via Quick Launch

I won't add all of the details here, but basically:

  • For 2010 team sites: Site Actions, Site Settings, Quick Launch
  • For 2010 publishing sites: Site Actions, Site Settings, Navigation, Current Navigation
  • For 2013 team sites: Settings (gear), Site Settings, Quick Launch
    or click EDIT LINKS in the Quick Launch area, click +link 
  • For 2013 publishing sites: Settings (gear), Site Settings, Navigation, Current Navigation


Adding Links via HTML

You can add custom HTML to Wiki pages, ASPX pages, Links lists and Content Editor Web Parts.

<input type="Button" onclick="window.location='yourCopiedUrlGoesHere'" value="click me">

<button type="Button" onclick="window.location='yourCopiedUrlGoesHere'" >click me</button>

<a href="yourCopiedUrlGoesHere">click me</a>


Adding Links via JavaScript

This option only applies to SharePoint 2013 and only for 2013 style workflows without Initiation Forms. (i.e. no user interaction before the workflow starts.) If you right-click a workflow link in Settings, Site Contents, Site Workflows (workflow.aspx), click Properties and see JavaScript instead of a URL it will probably look like this:
  javascript:StartWorkflow4('7032d6a6-66e0-4c22-9483-2971b90b0e64', '', '')

The nice thing about launching a workflow from StartWorkflow4 is that it is done using a CSOM web service call and does not cause the user to move to another page. Just click, and the workflow starts. The problem for us is that the StartWorkflow4 function is not available from every page in SharePoint. It's only available from workflow.aspx. To duplicate the code from that page you will need to add a link to a SharePoint JavaScript library and copy some JavaScript code from the workflow.aspx page.

The following assumes you are editing an ASPX page in SharePoint Designer, or you have placed the code in a text file and linked to that text file from a Content Editor Web Part.

Steps:

  1. Open SharePoint Designer 2013 and the open your site.
  2. If you are directly editing a page, open that page for editing. (You may need to click Advanced Mode in the ribbon.)
  3. If you are using a Content Editor Web Part for the code:
    1. Click Site Assets (could also use Site Pages or any other library).
    2. Right-click in the white space in the file list area and click HTML.
    3. Select all of the HTML and delete it.
  4. Add a link to the workflowservices.js library:
      <script type="text/javascript" src="/_layouts/15/sp.workflowservices.js"></script>
  5. Add a control to fire the JavaScript that you copied from the workflow page:

    <input type="Button" onclick="javascript:StartWorkflow4('7032d6a6-66e0-4c22-9483-2971b90b0e64', '', '')" value="click me">

    <button type="Button" onclick="javascript:StartWorkflow4('7032d6a6-66e0-4c22-9483-2971b90b0e64', '', '')">click me</button>

    <a href="" onclick="javascript:StartWorkflow4('7032d6a6-66e0-4c22-9483-2971b90b0e64', '', '') ; return false;">click me</a>
  6. Visit the Site Workflow page: Settings (gear), Site Contents, Site Workflows.
  7. Either use the browser's View Source command or press F12 and use the DOM explorer to view the HTML of the page.
  8. Search for StartWorkflow4.
  9. Browse backwards from there and find the previous <script… tag and copy from that <script tag to the matching </script> tag.
  10. Paste this into your SharePoint Designer file.
  11. Save the file.
  12. If you are directly editing a page, go to a browser and test the link.
  13. If you are using a Content Editor Web Part for the code:
    1. Go to the browser, navigate to the page where you would like to have the link.
    2. Edit the page.
    3. Insert a Content Editor Web Part.
    4. Edit the web part and in the properties panel enter the URL to your code page. Something like:
      https://yourServer/Sites/yourSite/SiteAssets/WorkFlowLinkCode.html
    5. Click OK in the properties panel.
    6. Save the page and test the link.


Enjoy!


Note: The OffWFCommon Feature

I have only done limited testing here… so buyer beware, and only do this on a test or dev farm.

I wanted to create a SharePoint Designer workflow that used ASPX forms instead of InfoPath forms as they were easier to customized for this project. I simply deactivated the OffWFCommon feature (by GUID), closed and reopened SharePoint Designer and then created a new workflow, which magically had ASPX forms. Not knowing what the side effects were, I reactivated the feature as soon as the workflow was written. This is a Site Collection level feature. As it is a hidden feature, you will need to use STSADM, PowerShell or code to activate or deactivate it.

Note: Even if it is on the server, activating this feature won't give you usable InfoPath forms on SharePoint Foundation!

Using STSADM:
   stsadm -o deactivatefeature -id C9C9515D-E4E2-4001-9050-74F980F93160 -url <url>

Using PowerShell:
   Disable-SPFeature -Identity c9c9515d-e4e2-4001-9050-74f980f93160 -url <url>

If you are curious, the feature lives here: (14 for 2010, 15 for 2013)
  C:\Program Files\Common Files\Microsoft Shared\Web Server Extensions\14\TEMPLATE\FEATURES\OffWFCommon


.

Note to spammers!

Spammers, don't waste your time... all posts are moderated. If your comment includes unrelated links, is advertising, or just pure spam, it will never be seen.