Showing posts with label Content Editor Web Part Tricks. Show all posts

2/09/2012

SharePoint: How to add JavaScript to a Content Editor Web Part


The following may be a bit redundant as it has been part of many of my “JavaScript hacks” posts, but I’m asked so often I thought I would put it in a article by itself.


The Content Editor Web Part (CEWP)

SharePoint 2007 gave us a nice little web part to insert HTML, CSS, JavaScript, and even just some text, in any web part page. SharePoint 2010 “broke” this web part a bit by trying to “fix up” our code. Add a little JavaScript to a CEWP and you will get this message:

    clip_image002

The message may mean that it did nothing to your code, reformatted your code (in strange ways), or completely removed your code!

Here’s a before and after of a “reformat”: 

clip_image002  clip_image002[4]


Link to your custom code, don’t add it directly to the CEWP

For both 2007 and 2010 the best practice is to link from the CEWP to a text file with your content. To avoid the problem with the random edits made by 2010 just upload a text file containing the code to a library. Then in the CEWP just click the Edit Web Part option in the dropdown and add the link to the code file. This has added benefit of using any HTML, CSS and JavaScript editor such as Visual Studio or SharePoint Designer to edit your code.


Steps:

  1. Create your HTML, CSS and/or JavaScript in a text file, Notepad will do, and save it with any file extension.
    Tip: Name your file with a .HTM extension and then the SharePoint libraries will add a “Edit in SharePoint Designer” link in the file’s dropdown menu!
        image

    Notes: Your JavaScript should be enclosed in <script> tags and your CSS should be enclosed in <style> tags.

     
  2. After uploading to a library, right-click the file’s name and copy the shortcut
        image
  3. Go go your SharePoint and insert a Content Editor Web Part
    (2010 on the left, 2007 on the right)
        image clip_image002[9]
     
  4. Click the web part’s dropdown menu and click Edit
        image
     
  5. Paste the URL to the Notepad file in the Content Link box
         image
     
  6. Save your changes and test

    And if you have any errors, just open the HTM file in SharePoint Designer, make your changes and save, and then go back to the browser and click refresh!  Much faster than constantly editing and save the web part.


Hide the title area

If the CEWP only contains HTML, CSS and/or JavaScript then you may want to hide the web part’s title bar. In the properties editor, expand Appearance, click the Chrome Type dropdown and select None.

    clip_image002[5]

Tip: Don’t “hide” the web part. Just turn off its title bar.


.
1/17/2012

Adding JavaScript to a SharePoint 2010 Wiki, and other Wiki Tips and Tricks


The SharePoint 2010 Wiki has a few interesting changes… some I personally think are oversights, some are SharePoint trying to keep you “out of trouble”.

Some of things I will look at here:

  • Why can’t I see a list of all of the Wiki pages?
  • The Rename Page button in the Ribbon is grayed out!
  • How can I insert JavaScript and other content not supported by the Ribbon? 


Why can’t I see a list of all of the Wiki pages?

Well… you can, if you know where to look! To see all of the pages you must:

  • Display any Wiki page (“Home” for example)
  • Click the Page tab in the Ribbon
  • Click View All Pages

              image

You could also just navigate directly to the AllPages page:

http://yourserver/sites/Training/YourWiki/Forms/AllPages.aspx

As neither of the above is going to be intuitive to your Wiki users you may just want to add a hyperlink to the home page of your Wiki called Index or Table of Contents.

image


The Rename Page button in the Ribbon is grayed out!

You have to be in the Edit mode before you can rename a page.

  • Display the Wiki page
  • Click the Page tab in the Ribbon
  • Click Edit
  • then click Rename Page

Warning: Exiting Wiki links to this page will get updated. For example, my original link was “Other Resources”. When I renamed the page to “SharePoint Blogs” the other pages where updated from [[Other Resources]] to [[SharePoint Blogs|Other Resources]].


Adding JavaScript to a Wiki Page

Let’s say you wanted to add a hyperlink to you wiki that links to an external page, and your corporate policy says that you must warn users that by clicking the link they are leaving the safety of your site. Just about every way of adding JavaScript to a Wiki page gets intercepted by SharePoint and the “offending code” is striped out.

     image

I even got creative and tried:

  • Editing the page in the browser and using the HTML button in the Ribbon
  • Editing the page in SharePoint Designer
  • Opening the page source from SharePoint Designer using Notepad, and then saving directly to the Wiki library

In all of these, SharePoint stripped out <script> blocks and converted hyperlinks with JavaScript to useless tags. For example:

   <a href="JavaScript:alert ('hello')"> say hello</a>

got converted to:

   <a>say hello</a>


The solution, like so many JavaScript tricks, uses the Content Editor Web Part.

In the example below I have a Wiki page for SharePoint blogs. For each blog I want to have a link to Bing to search for articles from each blog. These links must also display a warning about leaving the site.

The hyperlink looks like this:

Go search <a href="javascript: if ( confirm('This web site is external to the company and may not be safe!') ) { document.location='http://www.bing.com/search?q=site:techtrainingnotes.blogspot.com'; }">Bing</a> for more on this blog!


Steps:

  1. Edit the Wiki Page (display the page, click the Page tab in the ribbon and then click Edit)
     
  2. Click where you need the link, and then from the Insert tab in the ribbon click Web Part
     
  3. Click the edit dropdown on the web part and click Edit Web Part
     
  4. Click in the Content Editor’s text area and then click the HTML button in the ribbon
     
  5. Add your JavaScript, save and test

The Content Editors:

image


The resulting page after the user clicked the hyperlink:

image


.

1/13/2012

SharePoint: Hide List and Library Column Headings


I have updated the “Hide List and Library Column Headings” article to add notes for SharePoint 2010 and Office 365!

Go here for the details: http://techtrainingnotes.blogspot.com/2009/06/sharepoint-hide-list-and-library-column.html


Before (2007):

image

After (2007):

image


Before (2010):

image_thumb[3]

After (2010):

image_thumb[1]

Note: after this customization the checkbox column disappears, at least until you mouse over a document. Bug? I think it’s a bonus!


.

1/07/2012

SharePoint: Move the “Add New” Link to the Top of the Web Part


When you display a long list in a web part you will find that the “Add new” link is often out of sight at the bottom of the page. Your users will have to scroll to the find the link. This article takes a look at some JavaScript to change the order things are displayed in a web part.


The before and after:

image


Note: This has been tested on only one SharePoint 2010 installation, so use at your own risk and test, test and test.


Steps to make this change on only one page:

  1. Open Notepad and paste in the JavaScript from below
     
  2. Save the Notepad file with a name like "MoveAddNewItem.html"
     
  3. Upload this Notepad file to a library such as "Site Assets", "Site Files" or other library
     
  4. Go to that library, right-click this file and copy the Shortcut (the URL to the file)
     image
     
  5. Add a Content Editor Web Part below the last web part on the page, edit this web part, and paste the URL you just copied into the Content Link box.
    image
     
  6. Save your changes and test the result


Steps to make this change for all pages:

  1. Using SharePoint Designer, edit your master page
  2. Add the JavaScript below just before the </BODY> tag


The JavaScript

Notes:

  • The Try Catch is to deal with the picture library and the calendar, which do not add the “add new” links
  • If you are modifying the code, you will want to remove the Try Catch during your testing
  • The test for "ms-bottompaging" is for long lists that are displaying a previous / next links
  • The line that starts with “theTable = x” is one long line  ( theTable = x[i]…… )
<script>
// CEWP trick from techtrainingnotes.blogspot.com! 
// techtrainingnotes.blogspot.com/2012/01/sharepoint-move-add-new-link-to-top-of.html
// Find all tables
var x = document.getElementsByTagName("TABLE"); 
var ListList = "";

for (var i=x.length-1; i>0; i-- ) 
{
  // find just the tables that are list web parts (have a "summary" element)
  if (x[i].summary)
  {
    try {
      // Now find the "add new" rows
      var theTable = x[i].parentNode.parentNode.parentNode.parentNode.nextSibling;
      // but if the table is the paging table (next / previous) then get the next table
      if (theTable.innerHTML.indexOf("ms-bottompaging") > 0)
      {
        theTable = x[i].parentNode.parentNode.parentNode.parentNode.nextSibling.nextSibling.nextSibling;
      }

      // hide the unneeded horizontal line
      theTable.rows[0].style.display="none";
      // hide the extra blank space
      theTable.rows[2].style.display="none";

      // move the table    
      var theContainer = x[i].parentNode.parentNode.parentNode.parentNode.parentNode;
      theContainer.parentNode.insertBefore(theTable,theContainer);
    }
    catch (err123) {}
  } 
}

</script>


.

12/24/2011

SharePoint: Displaying PDFs from a Dropdown Menu

Browsing the MSDN SharePoint forums can really bring up some interesting ideas. Recently there was a question about how to display collections of PDF files in a web page. The question included a link to an article on embedding PDFs in SharePoint 2007 by Sharon Richardson. Sharon’s approach used an <embed> tag.

The <embed> tag’s SRC attribute is not updateable by JavaScript and I did not want a hard coded PDF file. I got to playing around with this and worked up a solution that uses an <IFRAME> and borrows some JavaScript from an article I wrote a while back. The JavaScript was used to convert a Links List into an HTML dropdown list (<SELECT>). Here I will use it to convert a library into a dropdown list and a PDF viewer.

Note: Displaying PDFs in SharePoint requires two things:

  • Your users must have a PDF viewer installed that can display PDFs in a browser
  • For SharePoint 2010 your server administrator much change “Browser File Handling” from Strict to Permissive for your web application (see here and here)

Another Note: :-)   This can also display pictures from a library! Just change step 4 below to include the proper file extensions.


2010? 2007?

This example was tested in SharePoint 2010, but should work just fine in 2007.


The result should look something like this:

   image


Steps:

  1. Add a web part part for the document library that contains the PDFs
     
  2. Edit the web part and in the properties panel click “Edit the current view”
     
  3. In the view page select just one column:  Name (linked to document)
  4. Configure the Filter section to select your files (my example just looks for “.PDF”)
     image
     
  5. Save the view
     
  6. Open Notepad and paste the JavaScript from below
     
  7. For initial testing you may want to comment out the line that starts with “x[i].parentNode.” (just add two slashes:  “// x[i].parentNode.”) – this line hides the library web part
     
  8. Edit the “var LibrarySummaryName = ” line to add your web part’s summary name
    To find the Summary name:
    1. Display the page with the web part
    2. Use the browser’s view source option to display the page’s HTML
    3. Search for “source=” and find the title of your web part (Note be sure to include all of the text including any spaces or periods that might be at the end)
       
  9. Edit the height and width attributes of the IFRAME tag to suit your needs (In pixels or percent)
     
  10. Save the file as “PDFdrowdown.html” or similar
     
  11. Upload the Notepad file to a library (Site Pages, Site Assets, or any library you have for miscellaneous site files)
    Note: You can now click the dropdown on this document and edit the file in SharePoint Designer
     
  12. Go to the library with the script file, right-click the filename and click “Copy Shortcut” (you will paste this into the Content Editor Web Part)
     
  13. Add a Content Editor Web Part and move it below the PDF library web part (important!)
     
  14. Edit this web part an paste the URL just copied into the Content Link box
     
  15. You should now be able to test the dropdown and display PDF files in the IFRAME area
     
  16. Final steps are:
    1. if you added them, remove the comment slashed added to the “x[i].parentNode.” line
    2. Edit the Content Editor Web Part and change the “Chrome” to none to hide the web part’s title


Hide the Toolbar and the Scrollbars!

To hide the scroll bars, just append options to the end of the URL like this:

Before:

    PDFcontrol1.src=url;

After:

    PDFcontrol1.src=url + "#toolbar=0&navpanes=0&scrollbar=0";

Page 8 of this file has other examples of what you can do with URL parameters for PDF files: http://partners.adobe.com/public/developer/en/acrobat/PDFOpenParameters.pdf#page=8

The results should now look like this:

image


The JavaScript

<!-- the dropdown list for the libray items -->
<br/>
Select a PDF to view:
<select name="PDFSelect" id="PDFSelect"
  onchange="javascript:LoadPDFtoIFRAME(PDFSelect.options[PDFSelect.selectedIndex].value)">
  <option>Jump to ...</option>
</select>
<br/><br/>

<iframe id="PDFiframe" src=""  height="600" width="400"></iframe>


<script>
// CEWP trick from techtrainingnotes.blogspot.com! 
// techtrainingnotes.blogspot.com/2011/12/sharepoint-displaying-pdfs-from.html

var LibrarySummaryName = "Shared Documents Share a document with the team by adding it to this document library."

function LoadPDFtoIFRAME(url)
{
    var PDFcontrol1 = document.getElementById("PDFiframe");
    PDFcontrol1.src=url
    
    // to hide the toolbar and the scroll bars change the above line to:
    // PDFcontrol1.src=url + "#toolbar=0&navpanes=0&scrollbar=0";
}


//code to hide the links list and populate the select list

//Find the library and hide it
var x = document.getElementsByTagName("TABLE") // find all of the Tables 
var Library;
var i=0;
for ( i=0; i<x.length; i++ ) 
{
  if (x[i].summary == LibrarySummaryName)
  {
    //
    Library = x[i];

    //hide the links list web part (tables in tables in tables ...)
    // Note: while testing, you may want to comment out the next line
    x[i].parentNode.parentNode.parentNode.parentNode.parentNode.parentNode.parentNode.parentNode.parentNode.style.display="none";
    break;
   } 
}

if (Library)
{
  //Copy all of the links from the link list to the select list
  var ToList = document.getElementById("PDFSelect");

  var links = Library.getElementsByTagName("A"); // find all of the links
  for ( i=0; i<links.length; i++ ) 
  {
    if (links[i].onfocus)
    {
      if (links[i].onfocus.toString().indexOf("OnLink(this)") > -1)
        { ToList.options[ToList.length]             = new Option(links[i].innerHTML, links[i].href); }
    }
  }
}
else
{
  alert("Library web part named '" + LibrarySummaryName + "' not found")
}
</script>


.


.

12/18/2011

SharePoint: Change the color of a web part column


Over in my article on color coding lists I got this question:

“Can you post a snippet of code that shows how to apply color to a particular column - the entire column (i.e., column 7)”

Well, here’s two possible solutions. And you can change anything about the column by changing the CSS. Set the text to bold, change the font family or font size, or add borders.


Change the color of a web part column using CSS

This is the more elegant solution, but it will not work with Internet Explorer 6, so it will not work for SharePoint 2007, or where you still have IE 6 users.

Note: the line starting with “table[“ and ending with “td + td + td” is all one line.

<style>

table[summary="Shared Documents Share a document with the team by adding it to this
document library."].ms-listviewtable tr + tr td:first-child + td + td + td { background:orange; } </style>

Steps:

  1. Add this style to a Content Editor Web Part
    or edit the page in SharePoint Designer and add it just before the end of the PlaceHoldMain area.
     
  2. Edit the text in “summary=” section to add the name of your list web part. To find the name, display the page with the web part in a browser and search for “summary=” and copy the text between the quotes.
     
  3. Edit the “td + td + td” to select your column (one td per column)
    If you want to color more than one column, copy the entire selector and adjust the number of td’s. Something like this:  (note the comma)

    table[summary="Shared Documents Share a document with the team by adding it to this document library."].ms-listviewtable tr + tr td:first-child + td + td + td ,
    table[summary="Shared Documents Share a document with the team by adding it to this document library."].ms-listviewtable tr + tr td:first-child + td + td + td + td + td  
    {
       background:orange;
    }

Change the color of a web part column using JavaScript

This solution should work for all browser versions (crossing fingers…), but you will need to test it in the browsers used by your visitors. This probably could be reduced to one line using jQuery.

Note: the line starting with “var webpartName”“ and ending with “library.” is all one line.

<script>

// from TechTrainingNotes.blogspot.com

// The web part name can be found by viewing the source of the page and
// searching for "summary="
var webpartName = "Shared Documents Share a document with the team by adding it 
to this document library."
; // first column is 0 // in SP 2010 the first column may be check boxes var columnToChange = 5; // find the web part's table var allTables = document.getElementsByTagName("TABLE"); for (var i=1;i<allTables.length;i++) { if (allTables[i].summary == webpartName) { // loop through the rows to change the column // set j=0 to include the column heading or j=1 to skip the heading var theTable = allTables[i]; for (var j=0; j<theTable.rows.length; j++) { // any style attribute of the cell can now be changed theTable.rows[j].cells[columnToChange].style.background="yellow"; } } } </script>

Steps:

  1. Add this JavaScript to a Content Editor Web Part and move the web part below the web part to add the color to
       or
    edit the page in SharePoint Designer and add the JavaScript just before the end of the PlaceHolderMain area.
     
  2. Edit the text in “webpartName =” section to add the name of your list web part. Display the page with the web part in a browser and search for “summary=” and copy the text between the quotes.
     
  3. Edit the column number to change (var columnToChange = 5; ). The first column is column 0.

    If you want to change multiple columns it might be easier to hard code the column numbers. For example, to change columns 2, 5 and 8: (remember to count from zero)

    Change:
      theTable.rows[j].cells[columnToChange].style.background="yellow";
    To:
      theTable.rows[j].cells[2].style.background="yellow";
      theTable.rows[j].cells[5].style.background="yellow";
      theTable.rows[j].cells[8].style.background="yellow";  
     
  4. To change the color of the column heading, change the FOR counter to zero:
         for (var i=0;i<allTables.length;i++)


.

9/04/2011

Slides and additional info from my SharePoint Saturday Columbus presentation


SharePoint 2007 & 2010 (and Office 365!) Customization for Site Owners


Here’s the PDF of the slides from my presentation for SharePoint Saturday Columbus (8/20/11): download it


More from the book…


Much of the background for this presentation is from my book “SharePoint 2007 and 2010 Customization for the Site Owner”. There you can find more on:

  • The basics of HTML, CSS, JavaScript and jQuery for SharePoint customization
  • How to undo SharePoint Designer customizations
  • Detailed steps to customize the 2007 site title and the 2010 title and crumb trail
  • Convert Quick Launch into a pop-out or accordion menu
  • Expanded versions of the blog articles listed below…


More from the blog…


Some of the content from the presentation is from past blog articles that include more detail:


See ya at SharePoint Saturday Cincinnati!


.

7/19/2011

SharePoint: Changing the “Add New” Icon


I just got an interesting question on the “Change the “Add New” message for a web part” article about replacing the icon in the Add New Item area of a web part. As CSS does not let you change the attributes of an element (i.e. “src=”), the solution is a bit of a trick.

The before and the after for SharePoint 2007:

image  image

And in 2010:

image    image

The CSS below first hides the existing icon, and then adds a background image to the anchor (“A”) tag. As this results in the text being displayed over the icon, the CSS also needs to add a little padding to move the text over a bit.

The CSS for both 2007 and 2010

Add just before the </head> tag in the master page or in a content editor web part on a single page.

<style>

/*  hide the existing image  */
.ms-addnew img
{
  display:none;
}

/*  add a background image  */
.ms-addnew a
{
  background:url(_layouts/images/titlegraphic.gif) no-repeat;
  padding-left: 25pt;
}

</style>


.

7/18/2011

SharePoint Saturday Columbus 2011!


Join me and thirty other speakers for a free day of SharePoint learning on Saturday August 20th, 2011.


Go and check out the list of speakers and register!  It’s FREE!

   http://www.sharepointsaturday.org/columbus/default.aspx

Stolen right from their web site:

Join SharePoint architects, developers, and other professionals that work with SharePoint 2007 and 2010 for SharePoint Saturday Columbus event.  SharePoint Saturday is an educational, informative & lively day filled with sessions from respected SharePoint professionals & MVPs, covering a wide variety of SharePoint-orientated topics.  SharePoint Saturday is FREE, open to the public and is your local chance to immerse yourself in SharePoint!


I will be speaking on a subject that I’ve always enjoyed (and what much of this blog is about), “SharePoint 2007 and 2010 Customization for Site Owners”.

This session will get you, the SharePoint Site Owner, started in customizing your SharePoint site. It is not a programming session, but does include some JavaScript coding. It is not a graphics design session, but does include some Cascading Style Sheets. It is not a SharePoint Designer session, but it will make use of it. And nothing requires access to the SharePoint servers.

While the session is for the SharePoint Site Owner, it's also for the developer who does not want to "reinvent the wheel". All you need to apply what you learn here are basic SharePoint skills, how to copy and paste and some puzzle solving skills.

And as I have just released a book on the same topic, I’ll be brining a few copies to give away! If you don’t want to wait until August, you can get it at Amazon (with free shipping) or until the end of July, directly from the publisher with a 25% discount (with this code: 77ULP6VH).


.

7/15/2011

SharePoint 2007: Moving the View Dropdown for Wide Lists


One of the annoying “features” of SharePoint 2007 is how the View dropdown gets pushed off of the page when working with list views with many columns.


Left part of the page:

image

One scroll to the right:

      image

Two scrolls to the right and we can now find the view menu:

            image


What would be nicer would be a View menu just to the right of the other toolbar buttons.

image


All we need to do is write a little JavaScript to find the toolbar TABLE and adjust the column widths.

Steps for a single view page:

  1. Display the list’s view page
  2. Click Site Actions, Edit Page
  3. Add a Content Editor Web Part and move it to the bottom of the page (below the list’s web part)
  4. Edit the Content Editor Web Part, click the Content Editor button and paste in the following JavaScript
  5. Save everything and test!

Steps for all lists, pages and views:

  1. Open SharePoint Designer and open your site
  2. Open your master page (typically default.master)
  3. Scroll to the bottom of the page and click just before the </body> tag
  4. Paste the following JavaScript
  5. Save everything and test!


<script>
// from TechTrainingNotes.blogspot.com
// find all tables var x = document.getElementsByTagName("table"); for (var i=0;i<x.length;i++) { // find the table with this class if (x[i].className=="ms-menutoolbar") { // change the widths of all of the cells to 0 for (var j=0; j<x[i].rows[0].cells.length;j++) { x[i].rows[0].cells[j].style.width="0" } // change the width of the last column x[i].rows[0].cells[j-1].style.width="100%" } } </script>

I tried to solve this little problem by using CSS instead of JavaScript. I got close, but ended up with an empty cell at the end of the row. So, let me know if you find a CSS solution.

<style>

.ms-listheaderlabel
{
  width:100%
}
.ms-menutoolbar
{
  width:0;
}
</style>


.

6/15/2011

Finding SharePoint GUIDs using PowerShell


Two years or so ago I posted an article on how to find site, web and list GUIDs using a console application or an _LAYOUTS application page. Here’s a little update to do the same thing with a few lines of PowerShell.

New! Finding SharePoint 2013 GUIDs using REST: http://techtrainingnotes.blogspot.com/2014/02/sharepoint-2013-and-office-365-finding.html

2007 version:

[System.Reflection.Assembly]::LoadWithPartialName("Microsoft.SharePoint")
$site = New-Object Microsoft.SharePoint.SPSite("http://yourserver/sites/yoursite")
$web = $site.OpenWeb("yoursubsite")
write-host "Site: " + $site.id
write-host "Web: " + $web.id
$web.lists | Format-Table title,id -AutoSize
$web.Dispose()
$site.Dispose()

2010 version:

$site = Get-SPSite http://yourserver/sites/yoursite
$web = $site.OpenWeb("yoursubsite")
write-host "Site: " + $site.id
write-host "Web: " + $web.id
$web.lists | Format-Table title,id -AutoSize
$web.Dispose()
$site.Dispose()

Note: You could change $site.OpenWeb("yoursubsite")  to $site.RootWeb to get just the top site.


Here’s what the output looks like:

image


.

4/16/2011

SharePoint 2007 Menu IDs


If you are writing client side JavaScript code to interact with the SharePoint menus you will need to know the IDs of the <ie:menuitem> tags. Below are several tables with some of the IDs used by menu items. Remember that in the SharePoint page these will include a prefix that might look like "zz22_" or “ct100_”.

If the ID you need is not listed here then view the source of your SharePoint page and search for the name of the menu item (“Edit Page”) or the text "ie:menuitem" until you find the one you need.

     image

You would then find the menu item using JavaScript or jQuery routines such as the examples below:

JavaScript:

<script type="text/javascript">
 var doc = document.getElementsByTagName('ie:menuitem'); 
 for (var i = 0; i < doc.length; i++)
  {
    itm = doc[i];
    if (itm.id.match('OpenInExplorer') != null)
      {
        itm.hidden=true;
        break; 
      }
  } 
</script>


jQuery:

$('ie\\:menuitem[id*=OpenInExplorer]').attr("hidden","true")


The is a list of items created in a typical WSS Master Page:

Menu ID name

Menu

Menu text

PersonalInformation

The Welcome menu

My Settings

LoginAsDifferentUser

The Welcome menu

Sign in as Different User

RequestAccess

The Welcome menu

Request Access

Logout

The Welcome menu

Sign Out

MenuItem_Create

Site Actions

Create

MenuItem_Settings

Site Actions

Site Settings

MenuIItem_EditPage Site Actions Edit Page

This is a list of items created by a typical document library allitems.aspx page:

(all of the above table plus the following)

Menu ID name

Menu

Menu text

New0 (zero, not O)

New

New Document (default click)

NewFolder

New

New Folder

_Upload (1)

Upload

Upload Document

MultipleUpload

Upload

Upload Multiple Documents

EditInGridButton

Actions

Edit in Datasheet

OpenInExplorer

Actions

Open with Windows Explorer

OfflineButton

Actions

Connect to Outlook

ExportToSpreadsheet

Actions

Export to Spreadsheet

ViewRSS

Actions

View RSS Feed

SubscribeButton

Actions

Alert Me

AddColumn

Settings

Create Column

AddView

Settings

Create View

ListSettings

Settings

Document Library Settings

DefaultView

View

All Documents (in typical library)

View1

View

Explorer View

ModifyView

View

Modify this view

CreateView

View

Create view

(1) Prefix the keyword "Upload" with the underline to not confuse with "MultipleUpload"


Unique to a Picture Library

Menu ID name

Menu

Menu text

EditPictures

Actions

Edit

DeletePictures

Actions

Delete

DownloadPictures

Actions

Download

SendPictures

Actions

Send To

ViewSlideShow

Actions

View Slide Show

Lists

Menu ID name

Menu

Menu text

EditInGridButton

Actions

Edit in Datasheet

ExportToDatabase

Actions

Open with Access


.

3/02/2011

SharePoint, JavaScript and Dates


How does your SharePoint site display a date?

The answer is… “it depends.”  Create a new task and schedule it for January 3rd, 2012. Now display the task list and see how the date is displayed.

Do you see this image  or this image

You would see the first if you had your SharePoint preferences (Regional Settings) set to a country where they enter dates as dd/mm/yyyy, such as France.

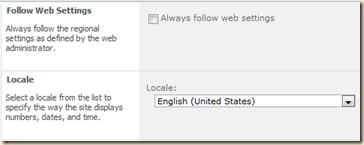
To play with the regional settings, click the Welcome menu at the top right of a SharePoint page and click My Settings. Then click My Regional Settings, uncheckmark “Always follow web settings” and pick a locale.

image  

image

image


So what’s the problem?

If you are writing JavaScript code that needs to work with the date you may get the wrong date! As an example, if you wrote some JavaScript to read the Due Date from a task and changed the color or font for past due tasks you would probably use the Date.parse method to test the date:

var colDueDate = 7; // list column with Due Date
if (d.getTime() >= Date.parse(row[i].parentNode.childNodes[colDueDate].childNodes[0].innerHTML) )
{
  row[i].parentNode.style.backgroundColor='red'; // set the color
}

In this example, if today’s date is February 15th 2012 and the Due Date is March 1st 2012 then Date.parse would show the task as past due for the French users and not past due for the United States users.

JavaScript date references:

http://msdn.microsoft.com/en-us/library/ff743760.aspx

http://www.w3schools.com/jsref/jsref_parse.asp


The fix?

Display the date in a format that Date.parse likes. JavaScript first attempts to parse the date as an ISO formatted date. It then tries a few other rules, but none of those support dd/mm/yyyy. What we need to do then is deliver a date from SharePoint that will always work with JavaScript, and one that always works is yyyy/mm/dd. You could just pick a locale that uses that format, but your users are not likely to be happy with that.

What works in my projects is to add a calculated column to my list that generates yyyy/mm/dd format, hide that column in the display and use that column for my JavaScript date math.

  1. Add a new column to your list and give it a name like DueDateYYYYMMDD
  2. Add a formula:
             =YEAR([Due Date])&"/"&MONTH([Due Date])&"/"&DAY([Due Date])

    image 
  3. Save your changes
  4. Add this new column to your view
  5. Add some tasks with a due date and verify that both Due Date and DueDateYYYYMMDD have the same dates, just formatted differently
  6. Go to your Welcome menu, click My Settings, My Regional Settings and change your locale to France and confirm that while the Due Date column has changed, the DueDateYYYYMMDD is still the same

Make it do something useful

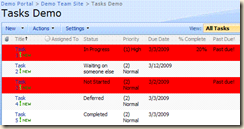
The JavaScript below is an update to the “SharePoint: Past Due / Late Tasks in a Task List” article. The code now works regardless of the SharePoint or user locale (date format) settings.

image


<script type='text/javascript'>
// customization trick from TechTrainingNotes.blogspot.com
 
var colDueDate = 6;  // This is the column with the due date in the YYYY/MM/DD format
var colToHide  = 6;  // This is the same column as above if you want to hide the custom date format
var colPastDue = -1; // optional column to display a custom JavaScript set message
var tableName = "Tasks"; // (from summary="")
 
// find the table for the list
var tables = document.getElementsByTagName("TABLE");
var table
for (x in tables)
{
  if (tables[x].summary == tableName)
  {
     table = tables[x];
     break;
  }
}
 
// hide the column with the special date (optional)
if (colToHide > -1)
{
  var TRs = table.getElementsByTagName("TR");
  for (x in TRs)
  {
 
    var toHide = colToHide;
    if (TRs[x].innerHTML)
    {
      if (TRs[x].innerHTML.toString().toLowerCase().indexOf("iframe") > -1 )
      { toHide += 1; }; // fix for 2007
 
      try {
      } catch (e) {}
      if (TRs[x].childNodes && TRs[x].childNodes.length >= toHide)
      {
        TRs[x].childNodes[toHide].style.display="none";
      }
    }
  }
}
 
// Color code the row based on a date calculation
var TDs = table.getElementsByTagName("TD");
var now = new Date();
for (i in TDs)
{
  if (TDs[i].className=="ms-vb2") //find the TDs styled for lists 
  {
    //find a row with a key phrase
    if (TDs[i].innerHTML=="Not Started"
         | TDs[i].innerHTML=="In Progress"
         | TDs[i].innerHTML=="Waiting on someone else" )   
    {
      // is this row (task) past due?
      if (now.getTime() >= Date.parse(TDs[i].parentNode.childNodes[colDueDate].innerText) )
      {
        // set the color
        TDs[i].parentNode.style.backgroundColor='red'; 
        
        // optionally display a message in another empty column
        if (colPastDue > -1)
          TDs[i].parentNode.childNodes[colPastDue].innerHTML='Past due!'; 
      }
    }
  }   
}
</script>


.

Note to spammers!

Spammers, don't waste your time... all posts are moderated. If your comment includes unrelated links, is advertising, or just pure spam, it will never be seen.